New Model
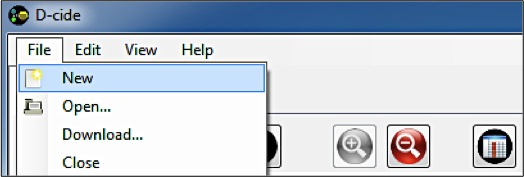
To begin a new model, open the D-cide© program, CLICK on File and select New.
The next step is to set the parameters of the model. Give the model a name in the "Model Name:" section. The Column Properties allows the user to set the time intervals that will be needed for the model. The Columns themselves represent contiguous portions of time so that the Day button would be continuous days of time; the Week button would be continuous weeks, and so on for the Month and Year selections. Choose the correct Start date next to the chosen interval button, and set the number of occurrences in the "Number of Columns" field. The "Influence Connection Type" displays the model in a Horizontal or Vertical fashion.
Note: When setting the "Influence Connection Type", be sure that it is set accordingly to how the model will be drawn. The default setting is set to 'Vertical', which is how most diagrams are drawn; from the bottom up. Be sure that when using either Influence Connection Type to draw the model accordingly, otherwise the user may encounter some functionality issues when attempting to make the Influence Connections between the objects in the drawing. The D-cide welcome screen provides a great example of the Vertical Influence Connection Type in constructing the model from the 'bottom-up' approach; this is the recommended default setting to use.
Click OK when the Model parameters are set.
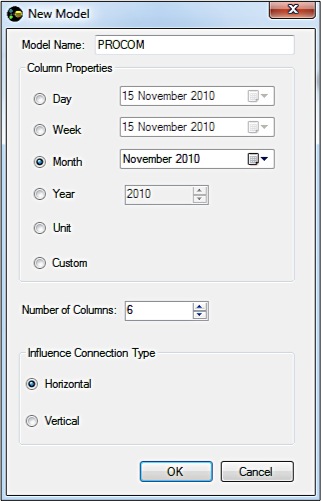
As Shown, The Column Properties are set to Month Intervals beginning on November of 2010. The Number of Columns (in this case, the number of Months together) is set to 6.
These Properties will produce 6 total columns representing continuous months so that November is the first column, and is followed by December, January, February, March, and finishes with the 6th column of April.
Once OK is clicked, a subsequent dialogue box will open to confirm the desired amount of Columns and their properties. It will also allow the user to enter a description of the model if so desired. This will help the user the most when a large diagram has to be created for a large amount of data. The user can use the description as a further reference.
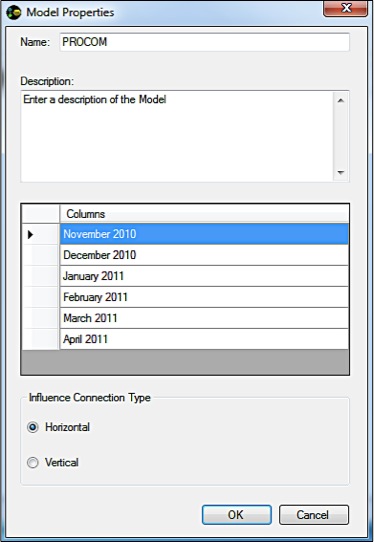
Make any changes to the Model Properties by editing the desired fields. Doubly click in the "Columns" section to edit the Column names if needed.
Add a Description to the model to explain the purpose of the model or reflect any surrounding information.
Click OK to advance to begin diagramming the model.
Note: The Column Properties can also be set to a Unit selection, using number units in sequence, or set to Custom intervals allowing the user to set his own columns.
The columns will appear on large drop down field on the right hand side of the toolbar. If there are 6 columns set in the Model Properties, there will be 6 selections representing each column in the drop down field to choose from. Each selection in the drop down represents a different 'page' of the model so that D-cide© can show the data/results coordinated with each time interval. Unlike the excel spreadsheets there are no tab located at the bottom to click on and name; and also there are no complicated ways to connect the months mathematical equations for proper relationships.
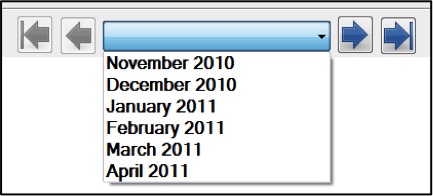
Each time interval or column of the model can be controlled and toggled through using this drop-down field and the arrows. The arrow will proceed to the next time interval page and the arrow with the line will proceed to the final column.
These features provide easy steps for the user to set their own personal perimeters. The software is built to automatically bring up the following steps or information edit boxes for the user to simply fill in text for the software to develop a data analysis.
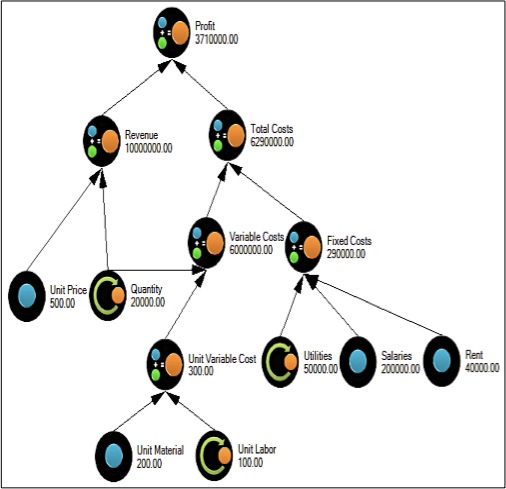
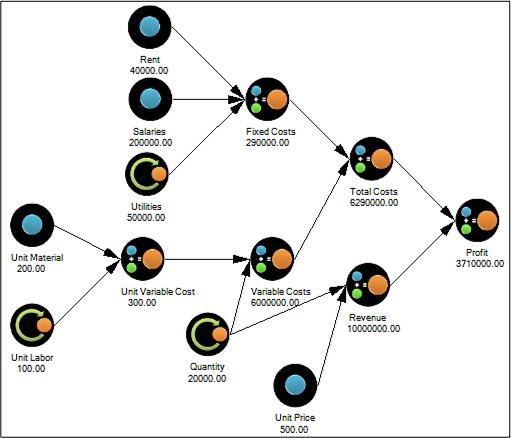
Below are two examples of completed influence diagrams. The example on the left is using a Vertical Influence and the example on the right is using a Horizontal Influence.
Note: All D-cide© models have a ".mod" file extension.
Vertical Influence Diagram |
| Horizontal Influence Diagram |
|
|
|